注意
转到末尾 下载完整的示例代码。或者通过 JupyterLite 或 Binder 在浏览器中运行此示例
向量量化示例#
本示例展示了如何使用 KBinsDiscretizer 对一组玩具图像(浣熊脸)进行向量量化。
# Authors: The scikit-learn developers
# SPDX-License-Identifier: BSD-3-Clause
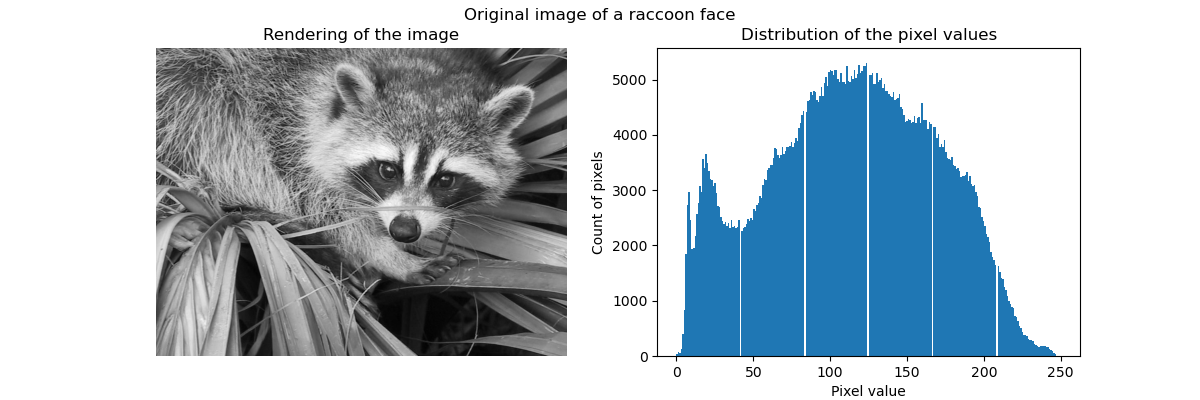
原始图像#
我们首先从 SciPy 加载浣熊脸图像。我们还将检查有关图像的一些信息,例如用于存储图像的形状和数据类型。
请注意,根据 SciPy 版本,我们必须调整导入,因为返回图像的函数不在同一模块中。此外,SciPy >= 1.10 需要安装 pooch 包。
try:  # Scipy >= 1.10
    from scipy.datasets import face
except ImportError:
    from scipy.misc import face

raccoon_face = face(gray=True)

print(f"The dimension of the image is {raccoon_face.shape}")
print(f"The data used to encode the image is of type {raccoon_face.dtype}")
print(f"The number of bytes taken in RAM is {raccoon_face.nbytes}")
The dimension of the image is (768, 1024)
The data used to encode the image is of type uint8
The number of bytes taken in RAM is 786432
因此,该图像是一个高 768 像素、宽 1024 像素的二维数组。每个值都是一个 8 位无符号整数,这意味着图像使用每像素 8 位进行编码。图像的总内存使用量为 786 千字节(1 字节等于 8 位)。
使用 8 位无符号整数意味着图像最多使用 256 种不同的灰度进行编码。我们可以检查这些值的分布。
import matplotlib.pyplot as plt

fig, ax = plt.subplots(ncols=2, figsize=(12, 4))

ax[0].imshow(raccoon_face, cmap=plt.cm.gray)
ax[0].axis("off")
ax[0].set_title("Rendering of the image")
ax[1].hist(raccoon_face.ravel(), bins=256)
ax[1].set_xlabel("Pixel value")
ax[1].set_ylabel("Count of pixels")
ax[1].set_title("Distribution of the pixel values")
_ = fig.suptitle("Original image of a raccoon face")
通过向量量化进行压缩#
通过向量量化进行压缩的目的是减少表示图像的灰度级别数量。例如,我们可以使用 8 个值而不是 256 个值。因此,这意味着我们可以高效地使用 3 位而不是 8 位来编码单个像素,从而将内存使用量大约减少 2.5 倍。我们稍后将讨论此内存使用情况。
编码策略#
可以使用 KBinsDiscretizer 进行压缩。我们需要选择一种策略来定义 8 个灰度值以进行二次采样。最简单的策略是使它们等距分布,这对应于设置 strategy="uniform"。从之前的直方图我们知道,这种策略肯定不是最优的。
from sklearn.preprocessing import KBinsDiscretizer

n_bins = 8
encoder = KBinsDiscretizer(
    n_bins=n_bins,
    encode="ordinal",
    strategy="uniform",
    random_state=0,
)
compressed_raccoon_uniform = encoder.fit_transform(raccoon_face.reshape(-1, 1)).reshape(
    raccoon_face.shape
)

fig, ax = plt.subplots(ncols=2, figsize=(12, 4))
ax[0].imshow(compressed_raccoon_uniform, cmap=plt.cm.gray)
ax[0].axis("off")
ax[0].set_title("Rendering of the image")
ax[1].hist(compressed_raccoon_uniform.ravel(), bins=256)
ax[1].set_xlabel("Pixel value")
ax[1].set_ylabel("Count of pixels")
ax[1].set_title("Sub-sampled distribution of the pixel values")
_ = fig.suptitle("Raccoon face compressed using 3 bits and a uniform strategy")

从定性上看,我们可以发现一些小区域出现了压缩效果(例如,右下角的叶子)。但总的来说,结果图像看起来仍然不错。
我们观察到像素值的分布已映射到 8 个不同的值。我们可以检查这些值与原始像素值之间的对应关系。
bin_edges = encoder.bin_edges_[0]
bin_center = bin_edges[:-1] + (bin_edges[1:] - bin_edges[:-1]) / 2
bin_center
array([ 15.5625,  46.6875,  77.8125, 108.9375, 140.0625, 171.1875,
       202.3125, 233.4375])
_, ax = plt.subplots()
ax.hist(raccoon_face.ravel(), bins=256)
color = "tab:orange"
for center in bin_center:
    ax.axvline(center, color=color)
    ax.text(center - 10, ax.get_ybound()[1] + 100, f"{center:.1f}", color=color)
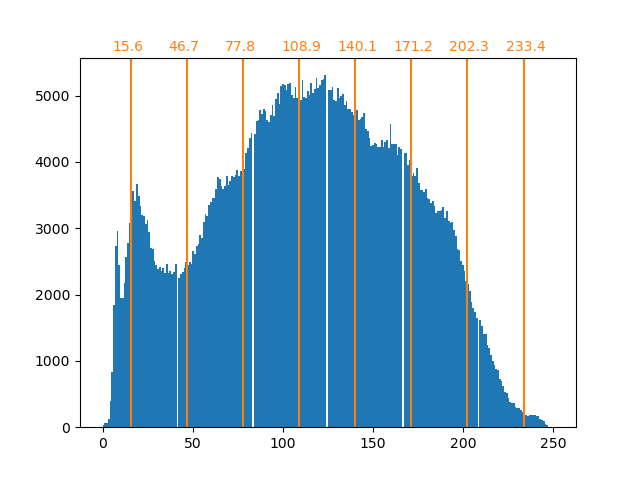
如前所述,均匀采样策略不是最优的。例如,请注意,映射到值 7 的像素将编码相对少量的信息,而映射到值 3 的像素将表示大量计数。我们可以转而使用聚类策略(例如 k-means)来找到更优的映射。
encoder = KBinsDiscretizer(
n_bins=n_bins,
encode="ordinal",
strategy="kmeans",
random_state=0,
)
compressed_raccoon_kmeans = encoder.fit_transform(raccoon_face.reshape(-1, 1)).reshape(
raccoon_face.shape
)
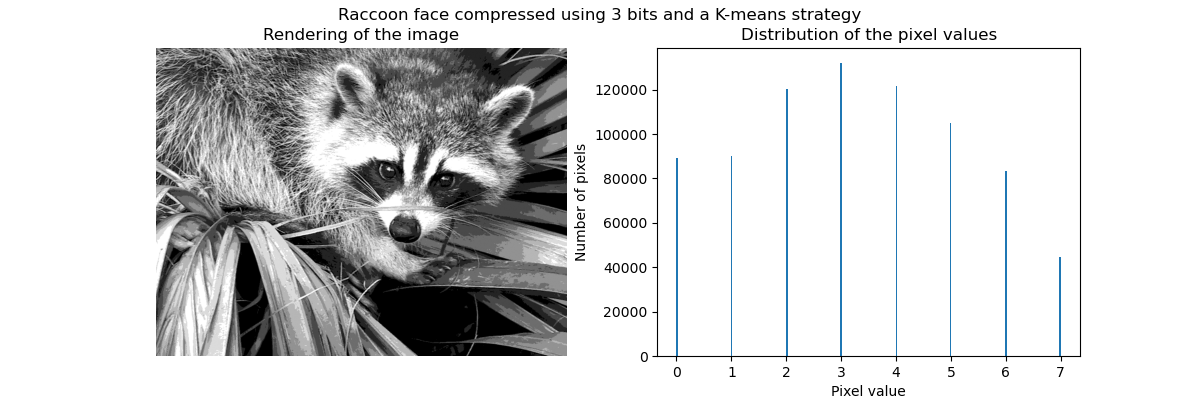
fig, ax = plt.subplots(ncols=2, figsize=(12, 4))
ax[0].imshow(compressed_raccoon_kmeans, cmap=plt.cm.gray)
ax[0].axis("off")
ax[0].set_title("Rendering of the image")
ax[1].hist(compressed_raccoon_kmeans.ravel(), bins=256)
ax[1].set_xlabel("Pixel value")
ax[1].set_ylabel("Number of pixels")
ax[1].set_title("Distribution of the pixel values")
_ = fig.suptitle("Raccoon face compressed using 3 bits and a K-means strategy")
bin_edges = encoder.bin_edges_[0]
bin_center = bin_edges[:-1] + (bin_edges[1:] - bin_edges[:-1]) / 2
bin_center
array([ 18.90934343,  53.33478066,  82.59678424, 109.22385188,
       134.67876527, 159.67877978, 184.72384803, 223.17132867])
_, ax = plt.subplots()
ax.hist(raccoon_face.ravel(), bins=256)
color = "tab:orange"
for center in bin_center:
    ax.axvline(center, color=color)
    ax.text(center - 10, ax.get_ybound()[1] + 100, f"{center:.1f}", color=color)
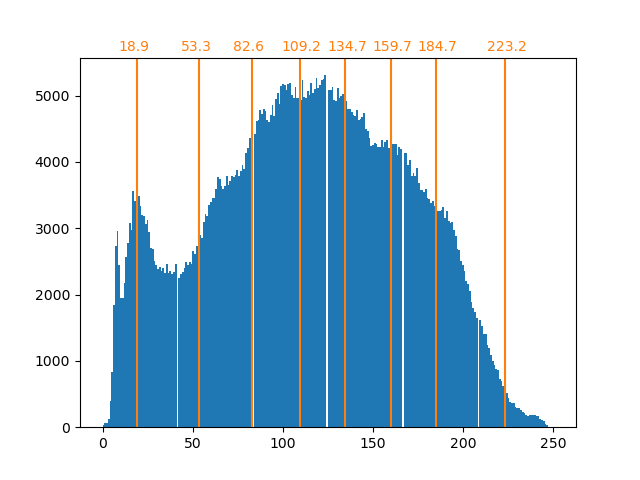
现在各 bin 中的计数更加平衡,其中心不再等距。请注意,我们可以通过使用 strategy="quantile" 而不是 strategy="kmeans" 来强制每个 bin 包含相同数量的像素。
内存占用#
我们之前说过应该节省 8 倍的内存。我们来验证一下。
print(f"The number of bytes taken in RAM is {compressed_raccoon_kmeans.nbytes}")
print(f"Compression ratio: {compressed_raccoon_kmeans.nbytes / raccoon_face.nbytes}")
The number of bytes taken in RAM is 6291456
Compression ratio: 8.0
令人惊讶的是,我们的压缩图像比原始图像占用了 8 倍的内存。这确实与我们预期的相反。原因主要是由于用于编码图像的数据类型。
print(f"Type of the compressed image: {compressed_raccoon_kmeans.dtype}")
Type of the compressed image: float64
实际上,KBinsDiscretizer 的输出是一个 64 位浮点数数组。这意味着它占用了 8 倍的内存。然而,我们使用这种 64 位浮点表示来编码 8 个值。实际上,只有当我们把压缩图像转换为 3 位整数数组时,我们才能节省内存。我们可以使用 numpy.ndarray.astype 方法。但是,3 位整数表示不存在,要编码 8 个值,我们也需要使用 8 位无符号整数表示。
实际上,要观察到内存增益,需要原始图像是 64 位浮点表示。
脚本总运行时间: (0 分钟 2.082 秒)
相关示例